Look at those mouth watering yeast doughnuts! Would you believe that they are gluten free? I haven't had a "real" yeast risen doughnut in years! Between 2006 and 2009 we lived a mere five minutes from a Krispy Kreme doughnut shop. What a thrill it was when the "Hot Now" sign was lit! We had to drive up and get a dozen. Who could resist warm glazed doughnuts?! Man, I have missed them!
In vain, two days ago, I attempted to make gluten free yeast doughnuts using a multi-grain flour. I was hoping to keep them somewhat healthy. They were a complete disaster! Let's face it! No one eats doughnuts because they are healthy. The dough was so sticky and unbelievably hard to work with. Using a doughnut cutter was not gonna happen either! I had to oil my hands and shape each one into something that resembled a doughnut and place them on parchment squares, which went into the oil along with the doughnut. Despite the dough being ridiculously soft and sticky, they ended up hard and soaked up too much oil. Not even close! I tried to convince myself that "They aren't that bad." So I coated them in chocolate in an attempt to make them taste better. That wasn't the case, and they went into the trash. What a waste of time and ingredients! Sigh!
Check out the photos of round #1 below.
 |
| Sticky Goo! |
 |
| What sad pitiful looking doughnuts! It pained me to throw them out. |
Ingredients:
- 1-1/2 cups sweet rice flour
- 1/2 cup tapioca starch
- 1/2 cup corn or potato starch
- 1-1/2 teaspoons xanthan gum
- 1 teaspoon pectin powder (I used apple pectin)
- 1/2 teaspoon salt
- 1/2 cup sugar
- 3/4 cup warm milk (not hot to the touch)
- 2 teaspoons active dry yeast
- 2 eggs, room temperature
- 1/4 cup oil or melted butter
- 1 teaspoon vanilla
- oil for frying (make sure it has a high smoke point)
- 2-1/2 cups powdered sugar
- 1 teaspoon vanilla
- 1/4 cup melted butter
- 1/4 - 1/3 cup hot water
- 1 cup powdered sugar
- 1 teaspoon cinnamon
In the bowl of a stand mixer, combine all of the dry ingredients except yeast, and mix well.
In a separate bowl, add the warm milk, yeast, oil, vanilla and eggs. Whisk until smooth.
With the mixer running on low speed, slowly pour in the milk mixture and run for 2 minutes.
The dough should be soft and sticky, but not something you could shape at this point.
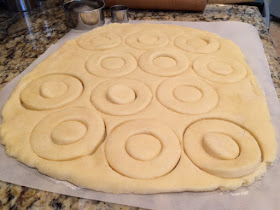
Cover the bowl and place it in the fridge overnight. You can see in the photo below how much the dough tightens up with a long rest.
After the dough has rested, place a floured piece of parchment on your work surface.
Add the dough and dust it with flour, then roll it out to 1/2 inch thick.
Cut out your doughnuts using a doughnut cutter or a 3" and 1" round biscuit cutter.
Re-roll any leftover dough and continue cutting.
Place the doughnuts and holes on a cookie sheet lined with floured parchment.
Cover with a clean towel and allow them to rise in a warm place until double in size.
Add oil to a Dutch oven or large pot to a depth of 2-3 inches. Heat oil to 350F.
Gently place 3 doughnuts into the hot oil and fry for 1 minute per side or until golden brown.
I don't recommend frying more than 3 doughnuts or 8 holes at a time,
the oil will cool too quickly if you crown the pan.
Carefully remove them and place on a wire rack that is placed over a baking sheet to cool slightly.
Allow the oil to come back up to 350F and continue with the remaining doughnuts and holes.
Also, make sure the oil doesn't get too hot, watch it closely!
 |
| Don't they look amazing?! |
To make the glaze, place powdered sugar, melted butter, vanilla and 1/4 cup of hot water in a small bowl, whisk until smooth. It should have a runny consistency but not watery. Add more water if needed. For powdered sugar doughnuts, simply stir together the powdered sugar and cinnamon.
Place the bowl of glaze into a larger bowl that has a couple inches of hot water in it.
This keeps the glaze warm as you work.
Place a doughnut into the glaze and flip over to coat both sides. Using a skewer or knife,
remove the doughnut and allow the excess glaze to drip back into the bowl.
Move it to a wire rack that's placed over a baking sheet so the excess glaze can drip off.
Continue with the rest of the doughnuts.
Before the glaze sets up, place them on a clean piece of parchment
so they don't stick to the cooling rack.
For the powdered sugar version, place the warm, not hot, doughnuts into the powdered sugar
and cinnamon mixture, turn to coat both sides.
Now enjoy the fruits of your labor! Look at that soft fluffy texture! Enjoy!
Once they are completely cool and the glaze has had a chance to set up, store them in a tightly sealed container to retain moisture. You could hold off on glazing some of them and place in the freezer tightly wrapped for another day, then glaze or powder them after they are thawed.


No comments:
Post a Comment
Thank you for your comments and suggestions!